latest tips and tricks

hi... dear friends..........first thanking u very much for being here to visit my blog,get latest tips and tricks,the site would be updated daily

Showing posts with label 3. Show all posts

Sunday, 5 February 2012

3.How to Block Websites without Using any Software in Windows

   If you want to block a particular website or websites so nobody can access them through your computer, then you can use this trick that I’ll show you in this article. This trick is useful in situations like you don’t want any children in your house surfing  certain websites or you use an application (like Photoshop CS5) that checks the validity of its key online and for some reasons you use a fake key or crack. You can block any website in Windows easily without using any software. Let assume that you want to block Facebook website. 
Now follow these steps:


1. Go to My Computer and then C:\Windows\System32\drivers\etc\hosts


You can block other sites simply by adding them under 127.0.0.1       localhost, for example you want to block Facebook as well as Orkut site, and then your host file must be like this:


127.0.0.1       localhost
 
ADD:-

::1                   localhost

127.0.0.1 www.facebook.com

127.0.0.1 www.orkut.com


Refer to the image below:


4. Instead of 127.0.0.1 you can also enter 127.0.0.2 and 127.0.0.3 (increase the IP address by one), like:


127.0.0.2 facebook.com


127.0.0.3 www.orkut.com


Both steps 3 and 4 working perfectly, actually when you add  


127.0.0.1 www.sitename.com 


then Windows handles all domain name resolution requests for www.facebook.com by the local machine as a substitute of configured DNS.


5. Go to your Internet browser and type the website address and see the result. If you want to unblock the website and back to the default, simply delete the lines that you have entered before.


    If u like this plz share it on facebook ,to elaborate the blog.

Wednesday, 18 January 2012

3.Use Facebook On Any Old Or New Mobile Phone Without Activating 3G or Edge

We all know how important some of the social networking websites like Facebook has become in our life. Not only on PCs or laptops, rather now it is being used through smartphones and other similar devices. But, the problem is that majority of users do not have smartphones and thus accessing web services like Facebook is a dream for them. So, in order to make this dream a reality, today we are going to discuss a new technique which provides this service and has been named as Facebook for Fonetwish service.
Fonetwish is basically a newly launched service which allows the users to access their Facebook account and that too without making use of the Internet connection. Along with this, it doesn’t require expensive or a particular category phone for the service. Rather, it allows any mobile phone users (almost) like from old Nokia 3100 to latest smart phone users to update Facebook status for free with the help of this service. Along with this status update feature, if you further need some more features then you need to pay a nominal fee for which you can get full control of your Facebook account. It also includes some of the advanced features from your old phone and that too without any need of internet connection or data plan for mobile phone which is a real big advantage.
Now let us talk about the usage of this service. In order to use it, you need to follow the below mentioned steps in the given order :
1. First of all, you need to Dial *325# from your mobile handset in order to get start with the service. Once you dial it, you may observe that a new pop-up will come up which will ask you to enter your Facebook account password. It will then verify your password and once verified, you will see menu for using Facebook on mobile phone.
clip_image001
2. This menu comprises of features like: Update status which as mentioned is available for free and other premium services like: news feed, post on wall, friend request and notifications which all are charged at Re. 1 per day for unlimited usage. As mentioned, you can update Facebook status quickly for free using this service which is a nice feature.
clip_image002
Currently, this service is supported by only few service providers such as Airtel, idea, Aircel, Tata Docomo in India and by XLcom, Telkomsel in Indonesia. So, if you are using either of these mobile operator services as your mobile connection service, then this service should work as explained above in few simple steps.

Friday, 2 December 2011

3.Quickly Access Desktop Icons and Files from your Web Browser

You may find this simple tip handy if you always have a web browser running on your desktop screen in maximized mode.


There are instances when you need to access program shortcuts and files placed on the desktop.


Now instead of minimizing the browser to access these files, you can simple create a shortcut in the bookmarks toolbar of your browser that points to the desktop folder. Click this bookmark and you’ll be able to browse through desktop content within the browser.

desktop

To create a bookmark pointing the desktop, open this address - file:///c:/Users/ - inside a new tab in Firefox. Click your user name and then drag-n-drop the "desktop" folder to your bookmarks toolbar.

Sunday, 6 November 2011

3.Send FAX For Free : Online Fax Services

We all know about fax service, So I am not explaining that stuff here because that might bore you, But we know its importance and its service thus at the same time all of us can't afford a fax machine to send a single fax to any office, Or we have to go to cyber cafe to send that one fax and thus full waste of time and money, So my friends I am here with the "Free online fax service" that will make us able to send as much fax as we want to send to others.


 Their are few websites that allows this awesome service of "Sending Fax Online For Free" and thus I have prepared a short list of that sites , Just have a check...


1 . Myfax
Website : http://myfax.com
Fax Limitation : Unlimited
Support : Text and Document (.doc , .pdf etc)
Fax Receive : No
Registration Requirement : No


2 . Pamfax
Website : http://www.pamfax.biz
Fax Limitation : Unlimited
Support : Text and Document
Fax Receive : Yes
Registration Requirement : Yes


3 . Faxzero
Website : http://faxzero.com
SMS Limitation : 2 faxes per day for free
Support : Text and Document
Registration Requirement : No


4 . Freepopfax
Website : http://www.freepopfax.com
Fax Limitation : Unlimited
Support : Text and Document
Registration Requirement : No


5 . Gotfreefax
Website : http://www.gotfreefax.com
Fax Limitation : 2 faxes per day for free
Support : Text and Document
Registration Requirement : No
So friends I hope you love this article on "Send Fax For Free : Online Fax Services" and their are many other websites which like this service and if you know any of that website then please donot forget to comment.

Sunday, 2 October 2011

3. Installing an Additional SMPS in your PC Installing an Additional SMPS in your PC

How can you not fall into trouble, if the power requirements of your computer aren't sufficiently provided for by your existing SMPS (Switch Mode Power Supply)? You might be wondering "Why put an extra SMPS when I just installed one with 300 Watts of power?" Your answer lies therein.

Well, for most of you power users out there, plugging in say, more than 3 IDE devices, which might be a combination of anything, from Hard Disk drives to CD/DVD ROM / RW drives or the latest SATA drives is a common practice... but it can never go beyond 4 devices, isn't it? Oh, did I forget to mention that cooling fans need some power too. It is very likely that you might end up with a blown SMPS or an unstable PC in case the power requirements of your computer are way beyond what the SMPS can deliver.

Say, you got a combination of the above devices along with some fans and your friend has got over his HDD to copy some of the cool stuff to and from your drive. You would be in a mess trying to figure out which drive to disconnect in order to connect his drive.

In such a scenario, to get many devices connected inside your PC and running peacefully at the same time, the only viable option seems to be replacing your existing 300W SMPS with the more expensive 450W or higher variant. But there's one more thing you can do to solve this problem and save a few bucks. Simply add another SMPS to your existing rig and enjoy the ride!

Just buy another SMPS from the market, with a true rating of at least 350 Watts. In case you are one of those who own a power-hungry card like the Geforce 7800, better go in for something more heavy duty such as a true 400 Watts SMPS. Ideally, replace your existing SMPS with this one and use the older one to drive smaller and less power hungry items in your computer (assuming that your new SMPS has a higher power rating than the old one).

To use an additional SMPS, you need to simply attach it to the various devices that would draw power from it as regular devices do. The ATX power connector needs to get a jump signal to turn it on. This happens when the necessary pins are shorted. It receives such a signal through your motherboard when you press the power switch. As your motherboard would only have one slot to connect the SMPS connector, you cannot connect the second SMPS to it. So to turn it on, you need to short particular wires or pins on the ATX power connector. 


The particular pins are pin number 14 and 15. Well, to identify the pins, simply do the following. Hold the ATX power connector with the notch facing towards you. There are two rows of 10 pins each; one closer to the notch (row B) and one on the other side (row A). The first pin from the right on Row A is pin 1 and the one on the extreme left is pin 10. Pins 2 to 9 understandably lie in between. Now move to Row B. The rightmost pin is pin 11. Start counting from right to left till you locate pins 14 and 15. You need to short these two pins. Still confused? Check out the following image... that should help you out. Mind you, we are talking about an SMPS with a 20-pin connector.  


When finished with locating the pins, take a small piece of copper insulated wire and open the ends up. Twist the strands at each end to make them stiff enough to hold on to the innards of the plug. Next, insert one end into the socket of pin 14 and the other in socket 15. After inserting the ends inside the sockets, use some scotch tape or insulation tape to secure the wire from falling off. Place the SMPS in a location away from your processor socket to prevent the hot air from blasting onto the processor heat sink and raising the temperature further.

You can keep the SMPS outside the cabinet provided the power cables are long enough to reach the other devices. Next, plug in the power connectors to the devices and close your cabinet. Yes, there has to be a small gap or a groove somewhere for the necessary cables to enter the cabinet. Attach a power cord to the extra SMPS and turn the switch on. Now, turn the main PC on. Make sure your second SMPS is also on, in case you have hard disk drives attached to it. This must be done in such a manner as during boot time, the power on signal invokes the MBR loader in each hard disk, thereby, other drives connected to the second SMPS will either not be recognized by the BIOS or will take a long time to boot. Also, be sure not to turn off the second SMPS while running Windows, in case there are any hard drives attached to it. That way, you may stand to lose data. A smart thing to do would be to connect all your hard drives to the main SMPS and your cooling equipment to the secondary SMPS. This includes all the fans as well as any super turbine cooler engines you may have installed.

There you go. You are a lot more powerful now. I mean you have more power at your disposal. Now, this may not be the most aesthetically appealing setup but can prove extremely effective in terms of both, power and cost. Certainly worth a try if you need that extra power and don't have deep pockets.


Caution:   Beware of short circuits and blown SMPS or fried motherboards/CPUs if done in an incorrect manner. Kindly take precautions while doing this exercise by disconnecting the power supplies and other hard disks or IDE drives. Check for a grounding or earthing connection prior to installing an additional SMPS for safety sake.

Thursday, 1 September 2011

3.Download Any Application without Using Credit Card


Those who are trying to download an application from sites which has an paypal order page & link to start you off.Just a little basic trick with the help of basic HTML tip you can download application without filling the credit card detail..

When you are using this  trick use a proxy to hide your ip address as some sites will record your ip when you connect to them for security.
Now the step by step detail for this pc trick :

1) Right click your mouse (ctrl+click) view source and open the source of the site in an a text editor

2) Search for the word "return"

3) Next to it you can find the url for the thank you page

4) Copy the url and paste it in your browser and you will see the download link

This works only if you can download instantly after payment, it will not work if the link needs to be emailed to you.
Use this  trick and start download your application without filling you Credit Card detail .

Friday, 12 August 2011

3.Convert Your 1Gb Memory Card To 2Gb Free

********** May not work in all memory cards **********
 
Wow this is really possible when i was searching for some hacking stuff online. i saw a post where people want to try whether this crack is really working or not. But they are not aware of it so they don’t want to take risk. And they didn’t even mention what the application is and from where it can be downloaded and etc. So i spent half day for searching the application here and there and finally got the crack in a small forum. So i was in a confusion that will this work or not. I just cant trust it and go blindly so i scanned it in all circumstances and started to convert the card. I was shocked when i completed the process of the application. I was amazed seeing my 1 GB memory card to 2 GB and all the data can be copied according to 2GB size. So just want to give this application to all our friends. 


Procedure:
1) First of all we have to make sure that its a 1 GB memory card. This only works on 1GB And it supports only in some of the rare cases of memory cards.
2) Now Backup all your data in that because we have to format the drive.
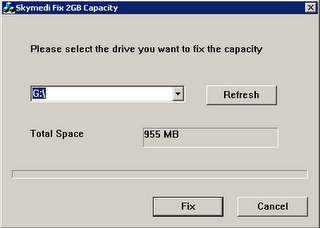
3) After backing up now open the Skimedi Fix 2GB Capacity application. i will upload a link at the end of post.
4) A small window will pop up showing the FIX and Cancel option. And you have to browse the drive where it is located (generally G: or L: drive for USB sticks)
5) After selecting the drive press on FIX and then the updating process will be followed up. It will ask your conformation whether you agree to format or not. click on yes.
6) Later it will ask to replug the device. Just replug the memory stick card and put it back. The size of the memory will be increased from 1Gb to 2Gb. you can see the properties before and after the cracking process.
7) After that you can also check the memory size in phone and also you can test the size by copying all the data to it which is around 2Gb.
8) I personally tested this and now i have converted my 1Gb to 2Gb and using 1.8 space with no problem.
 
9) You can reopen the Skimedi Fix and select the drive again where it shows us the size as 1912mb which is nothing but 2Gb.
10) Some times we get a parameter error while copying the files which have crossed the 1Gb size so this may not be 100% successful.